
Step by Step for Creating Holiday Nail Designs

Just in time for Christmas Party season and festivities, Lisa Lilley has created a step by step for the most popular and iconic nail designs that will make your clients jolly.
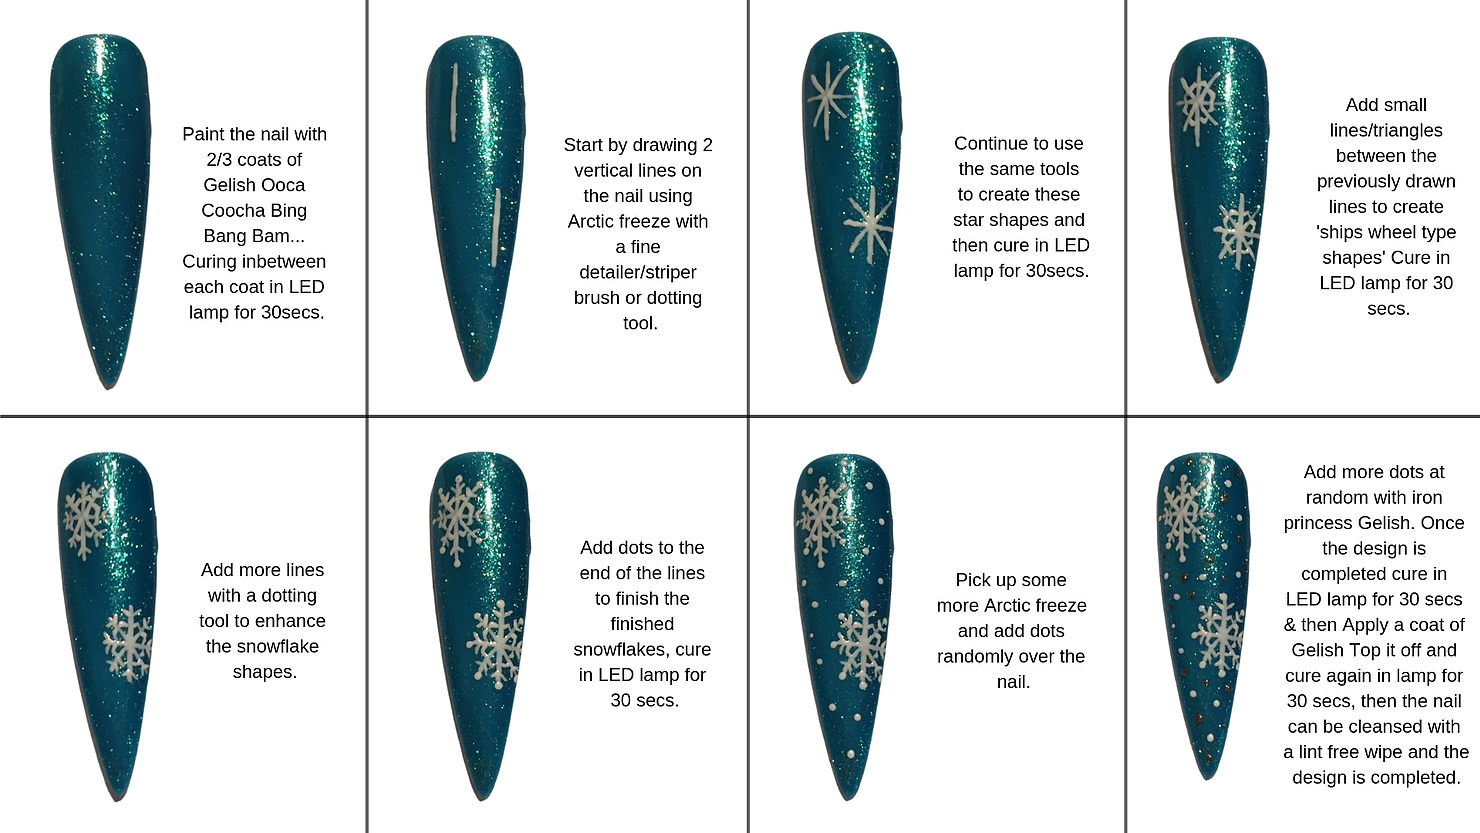
Design 1: Snowflake Design
Products used:
- Arctic Freeze Gelish
- Iron princess Gelish
- Ooca coocha bing bang bam alakazy alakazm Gelish
- Dotting tools/finer detailer brushes
- Nail art Palette
- Gelish Top it off
- (Also Gelish cleanser, ph bond, foundation & lint free wipes, 240/240 wooden file & 100/180 buffer, gel brush would also be needed to complete look on natural nail)
This design could be applied over acrylic nails after using a 1/180 grit file to refine the durance you could then go straight in with your first colour coat.
To apply to the natural nail, any traces of cuticle would need to be removed from the nail plate, the nail shaped using the 240/240 wooden file & shine removed from surface of the nail using the 180 side of a 100/180 buffer. The nail would then need to be cleansed with a lint free pad, ph bond applied and then a thin layer of Gelish foundation worked into the nail plate and cured in the Gelish LED lamp for 5secs. This would then need to be dry brushed with a gel brush and then you can go straight in with the colour.
Design 2: Holly Design
Products used:
- Arctic Freeze Gelish
- Just in case tomorrow never comes Gelish
- Polar Attraction Gelish
- Dotting tools
- Nail art Palette
- Gelish Top it off
- (Also Gelish cleanser, ph bond, foundation & lint free wipes, 240/240 wooden file & 100/180 buffer, gel brush would also be needed to complete look on natural nail).

This design could be applied over acrylic nails after using a 1/180 grit file to refine the surface you could then go straight in with your first colour coat.
To apply to the natural nail, any traces of cuticle would need to be removed from the nail plate, the nail shaped using the 240/240 wooden file & shine removed from surface of the nail using the 180 side of a 100/180 buffer. The nail would then need to be cleansed with a lint free pad, ph bond applied and then a thin layer of Gelish foundation worked into the nail plate and cured in the Gelish LED lamp for 5secs. This would then need to be dry brushed with a gel brush and then you can go straight in with the colour.
Design 3: Christmas Present Design
Products used:
-All that glitters is gold Gelish
-Queen of hearts Gelish
-Crystal stone embellishment
-Gelish structure gel
-Dotting tools
-Striper brush
-Nail art Palette
-Gelish Top it off
-(Also Gelish cleanser, ph bond, foundation & lint free wipes, 240/240 wooden file & 100/180 buffer, gel brush would also be needed to complete look on natural nail).

This design could be applied over acrylic nails after using a 1/180 grit file to refine the surface you could then go straight in with your first colour coat.
To apply to the natural nail, any traces of cuticle would need to be removed from the nail plate, the nail shaped using the 240/240 wooden file & shine removed from surface of the nail using the 180 side of a 100/180 buffer. The nail would then need to be cleansed with a lint free pad, ph bond applied and then a thin layer of Gelish foundation worked into the nail plate and cured in the Gelish LED lamp for 5secs. This would then need to be dry brushed with a gel brush and then you can go straight in with the colour.